8. Simplifying the deployment of your workstations
Many companies and administrations include software and configurations in the OS images they deploy on their fleets of hosts.
But from now on this is no longer the recommended method for several reasons:
Each time you make a new image, you waste a lot of time installing software and configuring it. You are very limited in the user configurations that you will be able to include in your image.
Each time you make a new image, you will have to keep track of the changes in a text document, a spreadsheet, or a change management tool.
OS editors (notably Microsoft) advise the use of raw ISO images and their parameterization in post-install.
Finally, if you introduce in your image security configurations, network configurations, or configurations to limit the intrusion of telemetry, these configurations can disrupt the normal functioning of WAPT, it will complicate future diagnostics.
With WAPT this is no longer necessary
Note
If your configuration is correct and you simply want to review the deployment method for a machine, you can refer to the quickstart guide.
8.1. Recommendations
Tranquil IT recommends:
To make only one raw image per OS type with MDT, Fog (win10, win2016, etc) or WAPT WADS without any configuration or software installation.
Warning
If you want to install a WAPT agent in your Windows image, follow these steps:
Run the following commands in CMD:
net stop waptservice
wapt-get delete-param uuid
wapt-get delete-public-param uuid
wapt-get delete-public-param hardware_uuid
wapt-get delete-param hardware_uuid
wapt-get delete-param hostname
wapt-get delete-public-param hostname
del "C:\Program Files (x86)\wapt\private\*.crt" "C:\Program Files (x86)\wapt\private\*.pem"
Do a Sysprep.
Then, shut down the machine.
To create as many Organizational Units as you have host types in the CN=Computers OU (ex: standard_laptop, hardened_laptop, workstations, servers, etc) in your Active Directory.
To configure your Active Directory to distribute the WAPT Agent by GPO to the different Host Organizational Units; this way, you can opt for fine grained configurations of your
waptagent.inifor the hosts attached to each OU.
Hint
To save you time, you can base your security configuration strategy on security WAPT packages already available in the WAPT Store, you will only need to complete them according to your Organization’s specific security requirements.
To create in the CN=Computers OU as many Organizational Units as there are types of computer usage in your organization (accounting, point_of_sale, engineering, sedentary_sales, etc).
To create generic WAPT packages of your software applications with their associated configurations.
8.1.1. Deployment scenario
You receive or the IT manager at the remote site receives a new computer in its box.
You configure the host’s MAC address in DHCP so that it gets the right system image and is positioned in the right Organizational Unit at the end of the deployment process.
The expected system image is downloaded on the host in masked time, the host is placed in the right Organizational Unit.
The WAPT Agent registers the host with the WAPT Server, it appears in the WAPT Console.
The WAPT Agent detects that it is in an Organizational Unit that requires a particular software set and a particular security configuration.
The WAPT Agent downloads and executes software packages and security configuration packages in hidden time; the WAPT Agent automatically removes delegated rights that are rendered useless after joining the domain to prevent them from being subsequently exploited in an unauthorized manner.
Either by group of hosts or host by host, you finalize the configuration of the hosts by assigning specific WAPT packets to them.
Hint
If you want, you can even leave the final configuration step to your users by configuring WAPT self-service for them (printer configurations, special software needs, etc).
8.2. Deploying your workstations via WADS 
WADS for WAPT Automated Deployment Services was developed to provide a simple solution for Operating System deployments via WAPT.
The OS Deployment is available for Windows, Debian and its derivates and for RedHat and its derivates.
8.2.1. WADS mode of operation
Schematically, deploying an OS involves 3 steps:
Importing the different media and files required for the deployment, such as Operating System .iso images, driver packs and configuration files.
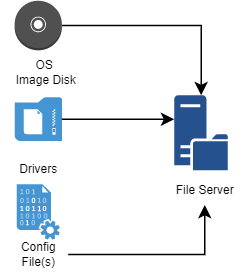
Flow diagram for importing the files required for the WADS deployment
Creating the boot support.

Flow diagram for creating the booting support for the WADS deployment
Launching the deployment on the target host using the network or a USB stick.
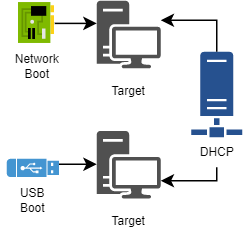
Flow diagram for using the boot support in the WADS deployment
8.2.2. Difference between WADS and other solutions
Classic deployment solution.

Flow diagram for a classic OS deployment
WADS deployment solution.

Flow diagram for a WADS deployment
Hint
The WADS operating mode respects the recommanded method of the OS vendor.
With WADS, all functionnalities are grouped on the same WAPT Server.
Therefore, there is no need to set up any additional infrastructure other than the WAPT Server.
8.2.2.1. Software differences
WADS deployment Server |
Standard MDT method |
Benefit |
|---|---|---|
Uses iPXE |
Uses CIFS file server protocol. |
No need to setup a file server and no need to open additional ports. |
No OS image configuration needed |
Requires manually editing an answer file configuration. |
Simplicity, all configurations are provided by WAPT |
Uses HTTPS to download the Windows OS image |
Uses CIFS to download the Windows OS image. |
The target hosts may be deployed over the internet using the USB stick method. |
The WADS method embeds all necessary files |
The MDT method requires assembling files from different sources. |
The deployment, the configuration and the OS updates are bundled into one WAPT software package. |
8.3. Installing and configuring TFTP and DHCP for WADS
8.3.1. Installing and configuring a TFTP server
Warning
If you have installed another tftp server on the WAPT Server, please uninstall it first.
This documentation is for WAPT 2.2.1 and higher.
Having port udp/69 open on the WAPT Server for inbound traffic as well as the tftp ephemeral port range (49152-65535)
Having tftp conntrack enabled on intermediate firewalls if you have firewalls between the server and the client computer.
Choose your distribution.
Enable and start the TFTP server.
systemctl enable wapttftpserver
systemctl start wapttftpserver
You may test that the tftp server works properly using a tftp client and test download the
snponly.efifile. If you are testing the following command on a RedHat based machine other than the waptserver, beware of the local outbound firewall that blocks outgoing tftp client requests.
cd ~
tftp srvwapt.mydomain.lan
  binary
  get snponly.efi
  quit
ls -l snponly.efi
When installing the server, tick the WADS tftp check mark. You can re-run the installer if it was not done at that time. You can check that the service is configured and running with the command:
sc query wapttftpserver
If the server is installed but not started, you can start it with:
net start wapttftpserver
8.3.2. Installing and configuring a DHCP server
You can either use HTTP or TFTP (slower) to download binaries.
Warning
Downloading through HTTP implies the use of an iPXE binary (ipxe.efi or snponly.efi) that is not signed and it will NOT BE POSSIBLE to enable SECURE BOOT on the client machines.
8.3.2.1. Hybrid DHCP configuration
Here is a configuration that transfers the bootfile and binaries through TFTP if UEFI is enabled. Secure Boot is possible.
Note
The Hybrid DHCP configuration, do not work for a Linux deploiement.
For example:
subnet 192.168.110.0 netmask 255.255.255.0 {
option routers 192.168.110.1;
option subnet-mask 255.255.255.0;
option domain-name-servers 192.168.110.1;
next-server 192.168.110.30;  # TFTP server (Option 66)

# If not iPXE
if not exists user-class {
  # If legacy BIOS
  if (option vendor-class-identifier = "PXEClient:Arch:00000") {
    filename "boot/pxeboot.n12";
  } else {
    filename "efi/boot/bootmgfw.efi";
  }
}
# If iPXE
else if option user-class = "iPXE" {
  # If legacy BIOS
  if (option vendor-class-identifier = "PXEClient:Arch:00000") {
    filename "http://srvwapt.mydomain.lan/api/v3/baseipxe?uefi=false&keymap=fr";
  } else {
    filename "http://srvwapt.mydomain.lan/api/v3/baseipxe?keymap=fr";
  }
}
}
For more information you can refer to https://ipxe.org/howto/dhcpd
For example:
# Basic DHCP configuration
interface=eth0
dhcp-range=192.168.110.10,192.168.110.100,12h
dhcp-option=3,192.168.110.1           # Default gateway
dhcp-option=6,192.168.110.1           # DNS server

# External TFTP server (Option 66)
dhcp-option=66,192.168.110.30

# Define client types
dhcp-match=set:legacybios,PXEClient:Arch:00000
dhcp-userclass=set:ipxe,iPXE

# Not iPXE and legacy BIOS → pxeboot.n12
dhcp-boot=tag:legacybios,tag:!ipxe,boot/pxeboot.n12,192.168.110.30

# iPXE and legacy BIOS → iPXE URL with uefi=false
dhcp-boot=tag:legacybios,tag:ipxe,http://srvwapt.mydomain.lan/api/v3/baseipxe?uefi=false&keymap=fr

# Not iPXE and not legacy BIOS → bootmgfw.efi (UEFI boot)
dhcp-boot=tag:!legacybios,tag:!ipxe,efi/boot/bootmgfw.efi,192.168.110.30

# iPXE and not legacy BIOS → iPXE URL with uefi=true (implied)
dhcp-boot=tag:!legacybios,tag:ipxe,http://srvwapt.mydomain.lan/api/v3/baseipxe?keymap=fr
You can use the following PowerShell command line to configure booting on your network. Please adapt the TFTP Server name and the deployment scope depending on your current installation.
$scopeId = "192.168.110.0"  # target network
$waptserver_ipaddress_tftp = "192.168.110.30"
$url_waptserver = "http://srvwapt.mydomain.lan"
$keymap = "fr"

# Define DHCP Classes
Add-DhcpServerv4Class -Name "legacy_bios" -Type Vendor -Data "PXEClient:Arch:00000" -ErrorAction SilentlyContinue
Add-DhcpServerv4Class -Name "iPXE" -Type User -Data "iPXE" -ErrorAction SilentlyContinue

# Define option 66 (TFTP) for the declared scope only
Set-DhcpServerv4OptionValue -ScopeId $scopeId -OptionId 66 -Value $waptserver_ipaddress_tftp

# Define policies for this scope

# 1. Legacy BIOS without iPXE
Add-DhcpServerv4Policy -ScopeId $scopeId -Name "pxebootn12" -Condition AND -UserClass NE,iPXE -VendorClass EQ,legacy_bios* -ErrorAction SilentlyContinue
Set-DhcpServerv4OptionValue -ScopeId $scopeId -PolicyName "pxebootn12" -OptionID 67 -Value "boot/pxeboot.n12"

# 2. iPXE + legacy BIOS
Add-DhcpServerv4Policy -ScopeId $scopeId -Name "wapt-ipxe-url-legacy" -Condition AND -UserClass EQ,iPXE -VendorClass EQ,legacy_bios* -ErrorAction SilentlyContinue
Set-DhcpServerv4OptionValue -ScopeId $scopeId -PolicyName "wapt-ipxe-url-legacy" -OptionID 67 -Value "$url_waptserver/api/v3/baseipxe?uefi=false&keymap=$keymap"

# 3. Non iPXE + non legacy BIOS
Add-DhcpServerv4Policy -ScopeId $scopeId -Name "bootmgfw.efi" -Condition AND -UserClass NE,iPXE -VendorClass NE,legacy_bios* -ErrorAction SilentlyContinue
Set-DhcpServerv4OptionValue -ScopeId $scopeId -PolicyName "bootmgfw.efi" -OptionID 67 -Value "efi/boot/bootmgfw.efi"

# 4. iPXE + UEFI
Add-DhcpServerv4Policy -ScopeId $scopeId -Name "wapt-ipxe-url-uefi" -Condition AND -UserClass EQ,iPXE -VendorClass NE,legacy_bios* -ErrorAction SilentlyContinue
Set-DhcpServerv4OptionValue -ScopeId $scopeId -PolicyName "wapt-ipxe-url-uefi" -OptionID 67 -Value "$url_waptserver/api/v3/baseipxe?keymap=$keymap"
8.3.2.2. HTTP configuration
The PXE booting is a two step process. First the UEFI/BIOS bootloader will download iPXE binary from the tftp server, then iPXE binary will download the iPXE script and boot binaries from http. This is why we need to have a two step PXE DCHP configuration.
For example:
<!-- global options -->
next-server 192.168.110.30;

option ipxe-url code 175 = text;
option client-architecture code 93 = unsigned integer 16;

<!-- subnet mydomain.lan netmask 255.255.255.0 -->

if option client-architecture = 00:00 {
  if exists user-class and option user-class = "iPXE" {
    filename "http://srvwapt.mydomain.lan/api/v3/baseipxe?uefi=false&keymap=fr";
  }
  else{
    filename "undionly.kpxe";
  }

} else {
  if exists user-class and option user-class = "iPXE" {
    option ipxe-url "http://srvwapt.mydomain.lan:80/";
    filename "http://srvwapt.mydomain.lan/api/v3/baseipxe?keymap=fr";
  }
  else{
    filename "snponly.efi";
  }
}
For more information you can refer to https://ipxe.org/howto/dhcpd
For example:
dhcp-match=set:ipxe,175 # iPXE sends a 175 option.
dhcp-boot=tag:!ipxe,undionly.kpxe,IP_WAPTSERVER
dhcp-boot=tag:ipxe,http://srvwapt.mydomain.lan/api/v3/baseipxe?uefi=false
For example for one machine:
dhcp-match=set:ipxe,175 # iPXE sends a 175 option.
dhcp-mac=set:waptserver,MAC_ADDRESS_TARGET_COMPUTER
dhcp-boot=tag:!ipxe,undionly.kpxe,waptserver,IP_WAPTSERVER
dhcp-boot=tag:ipxe,http://srvwapt.mydomain.lan/api/v3/baseipxe?uefi=false,waptserver
You can use the following PowerShell command line to configure iPXE booting on your network. Please adapt the $url_waptserver and $waptserver_ipaddress_tftp depending on your current installation. keymap is the keyboard language.
$waptserver_ipaddress_tftp = "192.168.110.30"
$url_waptserver = "http://srvwapt.mydomain.lan"
$keymap = "fr"

Add-DhcpServerv4Class -Name "legacy_bios" -Type Vendor -Data "PXEClient:Arch:00000"
Add-DhcpServerv4Class -Name "iPXE" -Type User -Data "iPXE"

Set-DhcpServerv4OptionValue -OptionId 66 -Value "$waptserver_ipaddress_tftp"

Add-DhcpServerv4Policy -Name "wapt-ipxe-url-legacy" -Condition AND -UserClass EQ,iPXE -VendorClass EQ,legacy_bios*
Set-DhcpServerv4OptionValue -PolicyName "wapt-ipxe-url-legacy" -OptionID 67 -Value "$url_waptserver/api/v3/baseipxe?uefi=false&keymap=$keymap"

Add-DhcpServerv4Policy -Name "wapt-ipxe-url-uefi" -Condition AND -UserClass EQ,iPXE -VendorClass NE,legacy_bios*
Set-DhcpServerv4OptionValue -PolicyName "wapt-ipxe-url-uefi" -OptionID 67 -Value "$url_waptserver/api/v3/baseipxe?keymap=$keymap"

Add-DhcpServerv4Policy -Name "snponly.efi" -Condition AND -UserClass NE,iPXE -VendorClass NE,legacy_bios*
Set-DhcpServerv4OptionValue -PolicyName "snponly.efi" -OptionID 67 -Value "snponly.efi"

Add-DhcpServerv4Policy -Name "undionly.kpxe" -Condition AND -UserClass NE,iPXE -VendorClass EQ,legacy_bios*
Set-DhcpServerv4OptionValue -PolicyName "undionly.kpxe" -OptionID 67 -Value "undionly.kpxe"

For more information, you can refer to https://ipxe.org/howto/msdhcp
Attention
If your DHCP server does not allow you to set such conditions, you can run the following script that will compile customized bootfiles:
/opt/wapt/waptserver/scripts/compile_ipxe.sh
It will create 3 bootfiles that you can use on your DHCP server: ipxe_custom.efi (UEFI), snponly_custom.efi (UEFI) and undionly_custom.kpxe (Legacy).
8.4. How to add computers to the wads list
To add a workstation, you must at least know its hostname and mac addresses.
With wapt you have three main ways in the top menu of WADS for adding computers.
By using button.
By using button.
By using button.
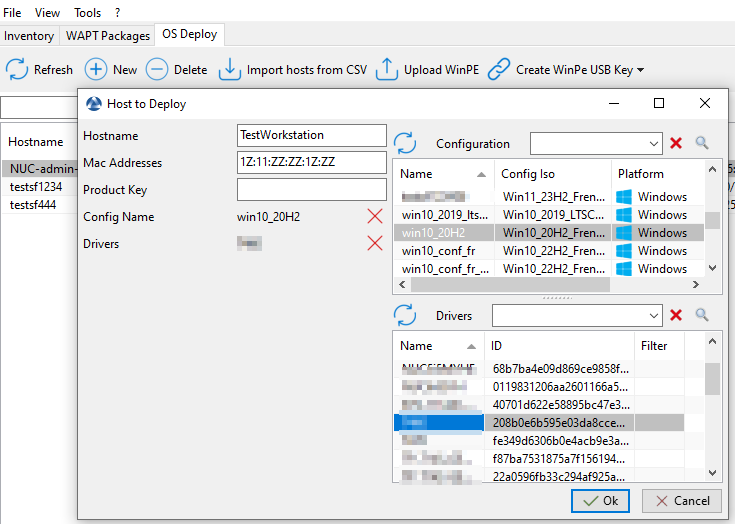
8.4.1. The New button
This option allows you to add individual computers manually. However, it does not support the configuration of multiple workstations at once.
If you already have Configuration and Drivers, you can drop them directly onto the new workstation to be deployed.
Example :
8.4.2. The Export selected hosts to WADS button
This method can be used for computers that already have a wapt agent registered in the WAPT server.
By default, the button is not present in the menu bar. It can be activated in the inventory tab of the WAPT.
Note
To activate the , Go to the Inventory, then right-click in the toolbar, select Customize the toolbar. In the “Available commands”, select “WADS”, and add in the “Toolbar commands”.
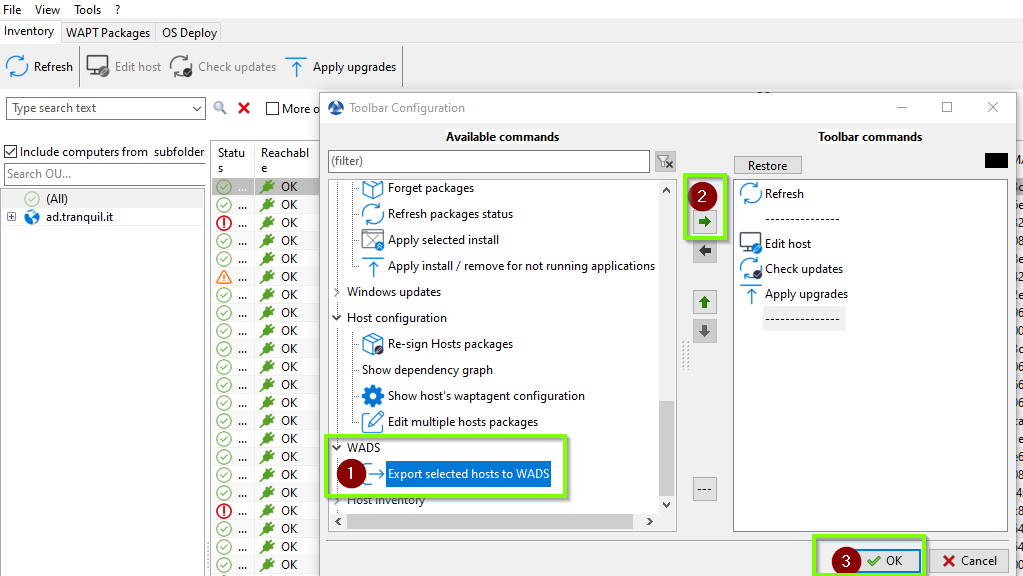
You can now select multiple workstations in the WAPT inventory and click on . The selected workstations will then appear in the WADS tab.
8.4.3. The Import CSV option
This option allows the addition of multiple computers at once using a single CSV file.
In the CSV file, you may include the following columns: “hostname”, “mac_addresses”, “status”, “waiting_to_deploy”, “product_key”, “deploy_config_name”, “driver_bundle”, “disk_format”, “djoin”, “manufacturer”, “uuid”, “product”, and “serial_number.”
The minimum required columns are “hostname” and “mac_addresses.”
Example of .csv document with the minimal requierement :
hostname;mac_addresses
test1;08:00:27:00:fd:c1
test2;08:00:27:00:fd:c2
test3;08:00:27:00:fd:c3
8.5. Deploying a Windows OS via WADS
Hint
Guidelines for Deploying Windows 11 OS
Windows 10 → Windows 11 (any version)
Full upgrade only, requires an ISO.
Windows 11 21H2 → Windows 11 22H2 or 23H2
Full upgrade only, requires an ISO.
Windows 11 22H2 → Windows 11 23H2
Feature update via enablement package (KB5027397).
or
Full upgrade requiring an ISO.
Windows 11 21H2 / 22H2 / 23H2 → Windows 11 24H2
Full upgrade only, requires an ISO.
8.5.1. IPXE Deployment process
Using BIOS/UEFI:
the host makes a DHCP request to obtain an IP and the PXE configuration (TFTP server IP & iPXE file name)
or
the host boots from a USB stick which embeds the PXE configuration
Note
Tftp is not a protocol that cannot be secured, so the preferred method is to boot using a USB key.
Using BIOS/UEFI:
the host makes a TFTP request to get iPXE and her configuration
or
the host runs the iPXE configuration from the USB stick.
Then, using iPXE, the host makes a HTTPS request to the WADS Server to obtain the BCD and the
WinPEfile.Finally, using WinPE, the host contacts the WADS Server via HTTP to obtain the OS iso file and its associated configuration files.
Warning
USB stick: secure boot possible (official winpe files used). Works only under Windows.
The ipxe file provided by WAPT does not support secure boot (ipxe file from https://ipxe.org/).
You can buy a signed ipxe file from https://2pintsoftware.com/ (iPXE Anywhere) in order to use the secure boot.
Deployment is also possible through TFTP exclusively although it is very slow.
8.5.2. Requirements before starting
To use WADS on your WAPT Console, you need to install a specific package on your management station.
Two packages are available, only one is needed. Choose according to your needs:
This package integrates the minimal requirements for creating a WinPE file.
As of 2026-04-16, the user account using the WADS Console MUST have Local Administrator rights in the WAPT Access Control Lists.
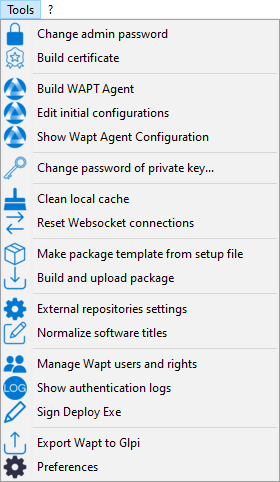
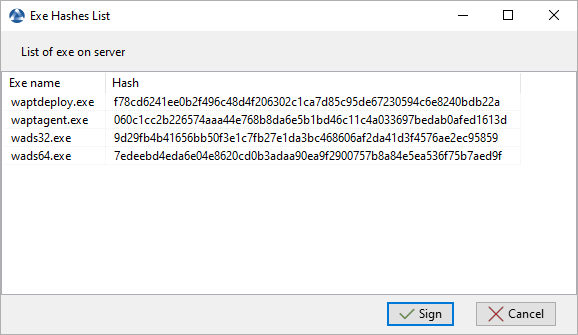
Signing WADS with your certificate:
Go to the .
Click on the Sign button:
Go to the OS Deploy tab:
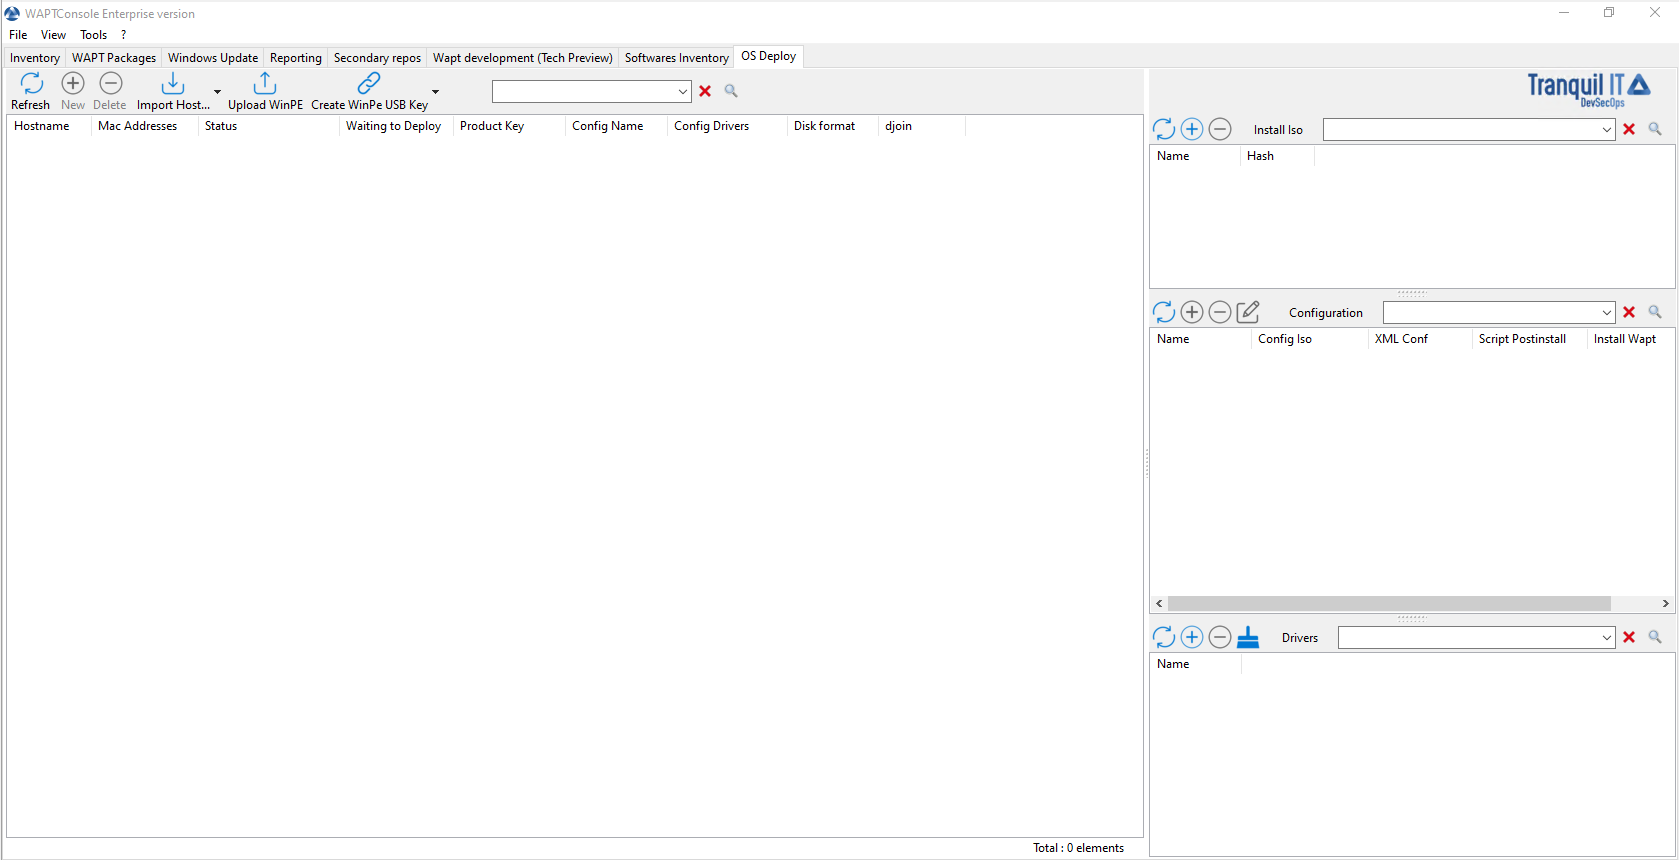
Main window of the WADS Console
8.5.3. Adding the WinPE files
Note
WinPE cannot be created from the Linux console. However, once the WinPE has been uploaded to the WAPT server (by Windows console), machine deployment can be managed from the Linux WAPT Console.
WinPE is a minimal operating system used to install, deploy, and repair Windows.
On WADS, WinPE is used to bootstrap the deployment of Windows.
If no WinPE file exists, or WinPE file is outdated then this pop-up will appear.
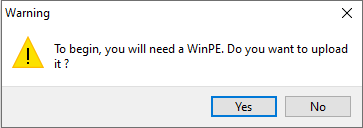

Then click on Upload WinPE.
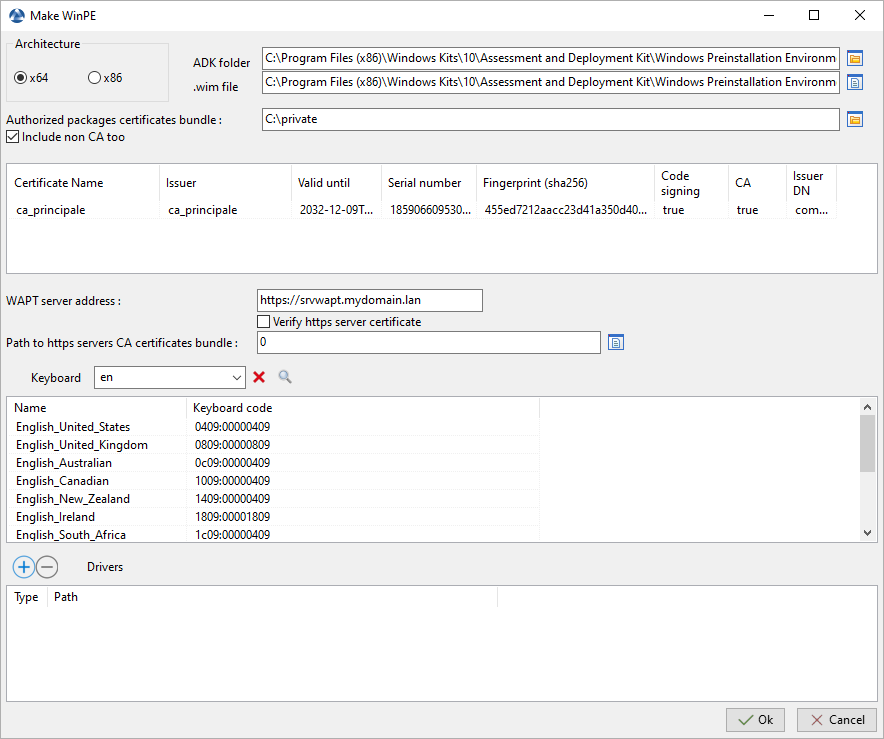
Choose the keyboard layout. This step is important because you will type in the hostname in WinPE using the keyboard layout chosen with this step.
Select the certificate with which to sign the USB stick files.
Note
Two options have been added to the WinPE configuration file:
Switch to Microsoft CA 2023 EFI Bootloader : When enabled, this option loads the EFI bootloader with Microsoft’s 2023 certificate. By default, WinPE boots using the 2011 certificate, which will expire in July 2026. Enabling this option ensures compatibility with modern secure boot requirements.
Ask for Static IP Address : If your deployment environment lacks DHCP, you can use this option to prompt for a static IP address and network configuration during deployment. A dialog box will appear on the target machine, allowing you to manually specify the required network settings.
If needed, please add network drivers in order to boot with PXE
Wait while the
WinPEfile uploads onto the WAPT administration computer.
Wait while the
WinPEfile uploads to the WADS Server.
The WinPE file has been successfully uploaded to the WADS Server.
Hint
After each upgrade, you will have to re-sign the WinPE file. Do not forget to keep up-to-date network drivers if needed.
8.5.4. Adding the Operating System ISO
The next step is to add the Operating System .iso file to use for deploying Windows.
Use the latest official Windows release from Microsoft as the .iso file.
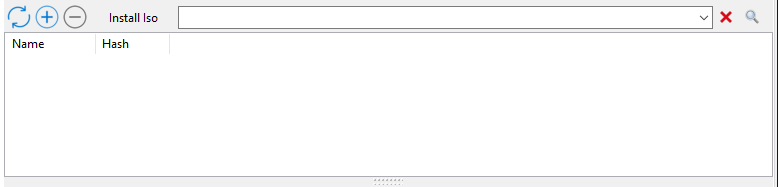
ISO section of the WADS Console
In the Install ISO section in the main WADS Console, click on the + button to upload the selected .iso file.
Select the .iso file and give it a name.
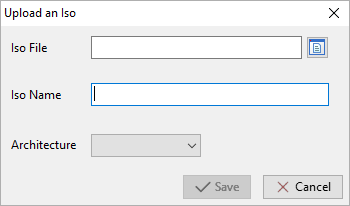
Dialog box for selecting the ISO file to upload to the WADS Server
When uploaded, the .iso file is signed with the selected certificate.
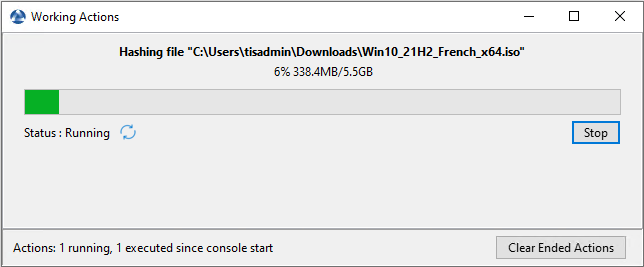
Dialog box informing of the signing progression of the ISO file in the WADS Console
After the signing step has successfully completed, the .iso file is uploaded to the WADS Server.
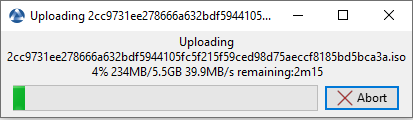
Dialog box informing of the uploading progession of the ISO file in the WADS Console
After the uploading step has successfully completed, the .iso file appears in the Install iso section in the main WADS Console.

Hint
It is possible to upload several .iso versions of Windows for different use cases.
8.5.5. Adding the Configuration answer file
The next step is to add the Configuration answer file that will be used to configure the deployment of the Windows Operating System.
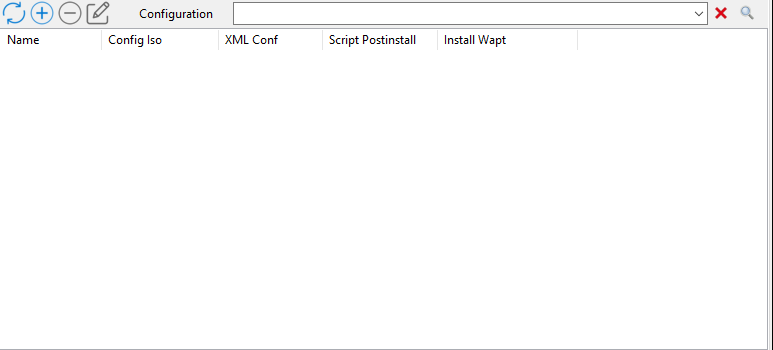
Answer file section of the WADS Console
In the Configuration section click on the + button to configure the answer file.
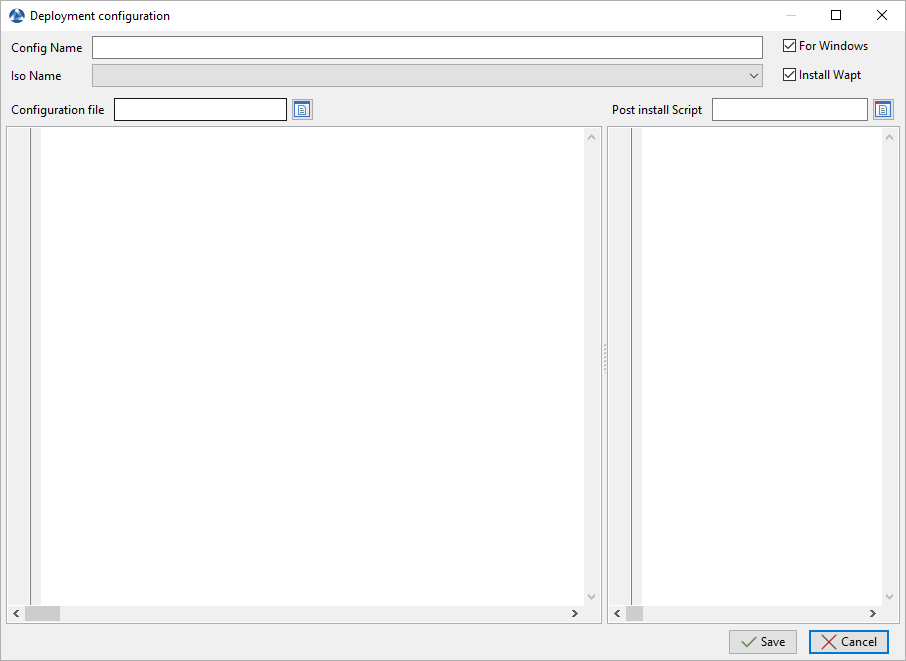
Window for creating the answer configuration file in the WADS Console
Options |
Description |
|---|---|
Config Name |
Defines the name of the XML answer file. |
ISO Name |
Defines the .iso file to associate to the XML answer file. |
For Windows |
Defines whether you install a Windows OS or Linux if unchecked. |
Install Wapt |
Defines whether to install the WAPT agent after the installation of the Operating System. |
Configuration file |
Defines the XML answer files template to use for Windows or the configuration file for Linux. |
Post install Script |
Defines a .bat post-install script to be run after the installation of the Operating System. |
Insert into the Config Name field the name of the answer file.
Select with the Iso Name dropdown the ISO file to association to the deployment configuration.
Check or uncheck the Install WAPT checkbox to install the WAPT Agent by default.
Check or uncheck the For Windows checkbox to install a Windows OS.
Select the answer file template to associate to the deployment configuration with the Configuration File field. If the OS is not Windows, select the configuration file for Linux.
If necessary, set the post-install script in Post install Script, for example:
Example 1 : If you want to install specific packages and wait for them all to be installed.

"C:\Program Files (x86)\wapt\wapt-get.exe" -S ping --trycount=10 --retrydelay=5
"C:\Program Files (x86)\wapt\wapt-get.exe" update -S
"C:\Program Files (x86)\wapt\wapt-get.exe" -S install package-name
"C:\Program Files (x86)\wapt\wapt-get.exe" -S install package-name2

Example 2 : If you just want to upgrade, and packages will be installed by OU.
start  cmd /c ping 127.0.0.1 -n 30  ^& start "" "C:\Program Files (x86)\wapt\waptexit.exe"
Click on the Save button to create the answer file.
When done, the configuration appears in the Configuration section.

Answer file added to the WADS Server in the WADS Console
Hint
It is possible to create several answer file configurations for different versions of Windows / Linux and for different use cases.
8.5.6. Joining the host to an Active Directory domain
You can use your own answer file with WADS but by default, WADS integrate 2 types of answer files for Windows:
Offline to join a computer with the DirectAccess Offline Domain Join (Djoin) method.
Online to join a computer on the AD.
Update this part with your join service account, you can give a specific OU if you want. If not, just delete the line MachineObjectOU.
<Identification>
  <Credentials>
    <Domain>mydomain.lan</Domain>
    <Password>password</Password>
    <Username>wadsjoin</Username>
  </Credentials>
  <JoinDomain>mydomain.lan</JoinDomain>
  <MachineObjectOU>OU=MyOu,OU=MyParentOu,DC=MyDomain,DC=lan</MachineObjectOU>
</Identification>
The offline method uses the Djoin method.
Right-click on the host to open the menu list.
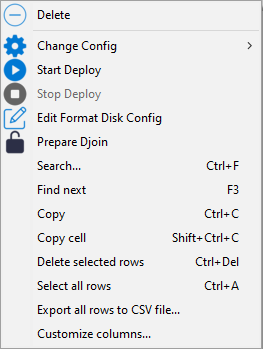
Click on Prepare Djoin.
Select the OU to which to attach the host (or define it manually) and click on Save.
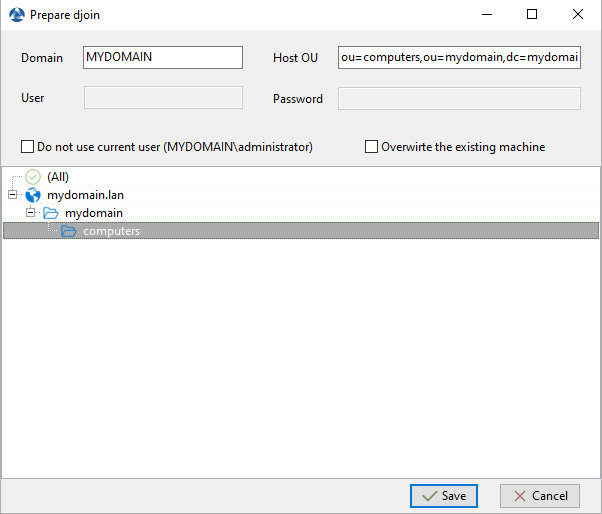
Selecting the Organizational Unit to which to automatically attach the re-imaged host
You can check Do not use current user if your current user can not or must not join a computer to the domain. If checked, you have to give manually Domain, Host OU, User (just the sAMAccountName, not the UPN nor the DOMAINuser) and password.
You can check Overwrite the existing machine in order to join anew a computer.
The
Djoinfile is ready to be used to join the host as a member to the Active Directory domain.
8.5.7. Adding drivers
The next step is to add driver bundles that will be used during the deployment of the Windows Operating System.
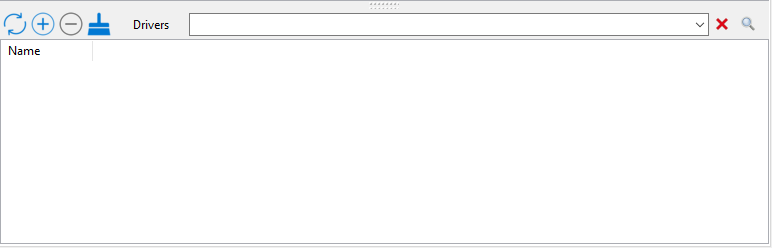
Drivers section of the WADS Console
In the Drivers section click on the + button to add a driver pack to the WADS Server.
This window allows you to upload the driver bundles to associate to the Windows deployment.
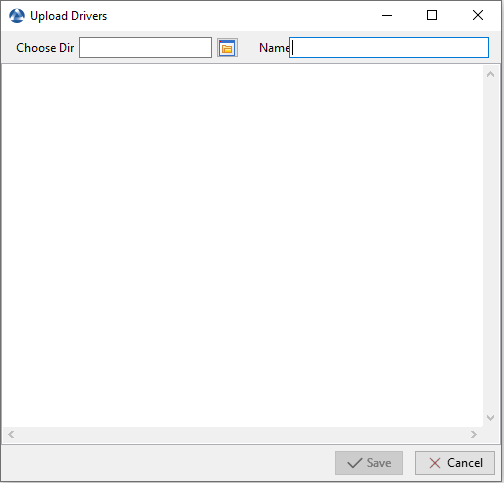
Window for creating the driver bundles in the WADS Console
Options |
Description |
|---|---|
Choose Dir |
Defines the path to the folder containing the driver bundles. |
Name |
Defines the name of the driver bundle. |
Click on the Save button, the uploading of the driver bundles starts.
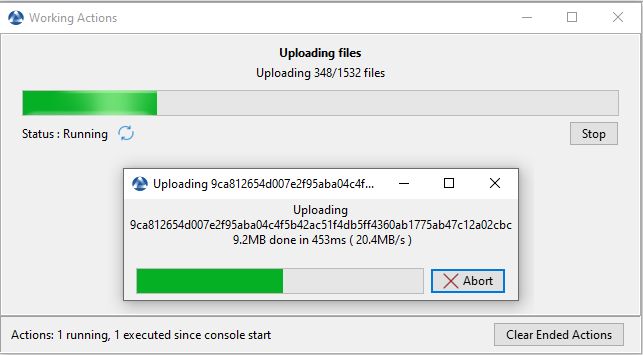
Dialog box informing the uploading progression of the driver bundles in the WAPT Console
When uploaded, the drivers pack appears in the Drivers section of the WADS Console.

The drivers pack has been uploaded to the WADS Server
It is possible to create several driver packs for different versions of Windows and for different use cases.
It is possible to use the .cab files from OEM.
It is also possibe to export the drivers from an existing well functioning host using a Powershell command.
Export-WindowsDriver -Online -Destination D:\Drivers
Hint
It is possible to create driver filters. This saves time during future deployments by specifying the manufacturer and product for which the driver is intended.
Add driver name and filter, respecting the case of the information returned by the WAPT server.
Example: For a Lenovo (manufacturer) 20HES7LV1M (product), you can create the filter LENOVO\20H*.
The powershell command will be : Get-WmiObject Win32_ComputerSystem | Select Model,Manufacturer
In the image below, you can observe that the effective configuration driver is DriversVM. This is because the manufacturer and product details match one of the filters.
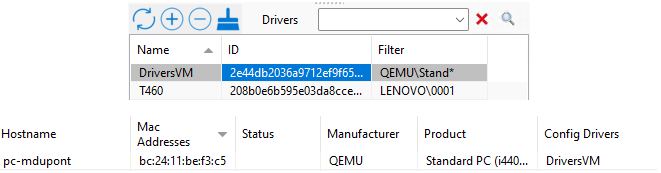
Example of filters drivers
Two ways to create a filter
1/ When adding a driver in the driver tab in the windows you can complete filter.
2/ By selecting a machine and right-click → change driver → create driver bundle.
How to use automatic drivers filters
Select the machine → auto select driver bundle → the driver with the correct filter will appear.
8.5.8. Booting the host to re-image with WADS
WADS allows 2 methods boot the host to re-image:
8.5.8.1. Booting the host with a USB stick
Note
The USB key used MUST be FAT32 formatted and empty.
Insert the USB stick in the WAPT adminsitration workstation and click on the Create WinPE USB Key button to start the process.
Choose the keyboard layout. This step is important because you will type in the hostname in WinPE using the keyboard layout chosen with this step.
Select the certificate with which to sign the USB stick files
Click on the Upload WinPE to format the USB stick and copy the WinPE file.
Boot to the computer’s boot menu using the USB stick option and go to the run the deployment step.
Note
You can Export to zip when you create a WinPE USB Key if you can not use a USB key and then burn it onto a CD / DVD instead.
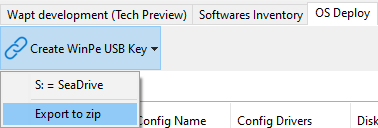
WADS button to select export to zip
8.5.8.2. Booting the host with the network
Booting from the LAN requires:
A properly working TFTP server;
A properly working DHCP server;
Having port 69 open on the WAPT Server for inbound traffic, and having tftp conntrack enabled on intermediate firewalls if you have firewalls between the server and the client computer.
Boot to the computer’s boot menu using the LAN option and go to the run the deployment step.
8.5.9. Deploying the Windows image
There are 3 choices when booting with iPXE:
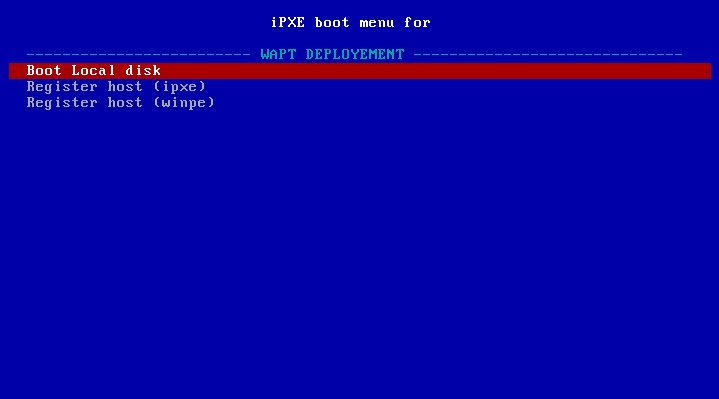
iPXE boot menu window
Boot Local disk for starting normally from local storage;
Register host (ipxe) to register the host with the WADS Server using the iPXE method;
Register host (winpe) to register the host with the WADS Server using the WinPE method.
If choosing Register host (ipxe), define a hostname.

Text terminal window requesting a hostname when registering using the iPXE method
Warning
The keybord is qwerty
Refresh the WADS Console with F5, the host appears in the OS Deploy tab.

Host waiting to be deployed
At this time, the Waiting to Deploy status of the host is False.
Right click on the host to open the menu list.
Go to and select a XML answer file.
Click on Start Deploy, the Waiting to Deploy status of the host switches to True.

Reboot the host to the same boot option as before (USB or LAN), Windows will start to install.
When the installation has completed, the OS Deploy tab, the status switches to Done.
If choosing Register host (winpe), define a hostname:
Text terminal window requesting a hostname when registering using the WinPE method
The keybord is in the same layout as the one set during the WinPE step of this documentation.
Refresh the WADS Console with F5, the host appears in the OS Deploy tab.
Host waiting to be deployed
At this time, the Waiting to Deploy status of the host is False.
Right click on the host to open the menu list.
Go to and select a XML answer file.
Click on Start Deploy, the Waiting to Deploy status of the host switches to True.
Reboot the host to the same boot option as before (USB or LAN), Windows will start to install.
When the installation has completed, the OS Deploy tab, the status switches to Done.
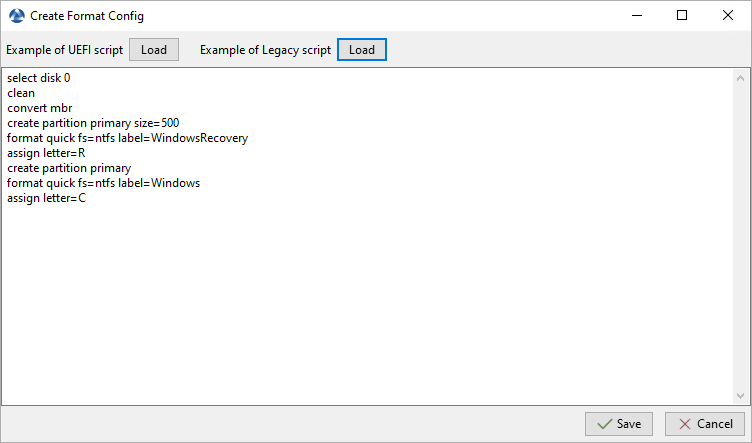
8.5.10. Format host disk
When your host is ready to be redeployed, if necessary, you can format its disk using the UEFI or the Legacy method.
To do so, right-click on host then Edit Format Disk Config.

Then you can choose either the UEFI or the Legacy script and customize the disk format configuration. Here is an example with the Legacy script: