2. FAQ - Server Issues
2.1. How to change correctly my CA (SSL/TLS) certificate
2.1.1. SSL/TLS Certificate Authority (CA) Renewal Before Expiration
Danger
Important Notice for Future WAPT Server Updates
During the next update of your WAPT server, ensure that the new WAPT agent relies on the updated certificate and not the old one. Failure to validate this may result in connectivity issues between the agents and the server.
Since the current SSL/TLS certificate has not yet expired, agents remain accessible from the WAPT console. The objective of this procedure is to deploy the new Certificate Authority (CA) alongside the existing one in a controlled and phased manner.
Important
This procedure is intended for those who wish to move from a :
pinning certificate to pinning certificate (internal PKI, or auto signed certificate)
pinning certificate to commercial certificate
commercial certificate to pinning certificate
If you go to commercial certificate to another commercial certificate, you just keep the parameter verify_cert = 1.
That should be enough, but do a test before go to prod.
2.1.1.1. Detailed procedure for the development environment test.
1: Prepare Your Test Environment
To safely test the new CA agent, start by creating a copy of your WAPT server (clone it) and set up a controlled lab environment.
Set Up the Test Environment:
Add your WAPT server and a WAPT agent (example; a Windows machine) to your test lab. Ensure network connectivity between the two machines.
Install the Current Agent:
Deploy the current WAPT agent from your server to the test machine. If the machines are in a workgroup, use the IP address instead of the FQDN to establish communication (example; https://10.11.9.70 )
Verify Agent Functionality:
Test basic operations:
Run wapt-get update to ensure package synchronization.
Send a test message using waptmessage to confirm communication.
Once Phase 1 is successfully completed, you can proceed to the next phase.
2: Merge the Two Certificate Authorities (CAs):
To combine the existing and new CA certificates:
Access the WAPT Server Navigate to the WAPT server and locate the current CA certificate:
cat /opt/wapt/waptserver/ssl/cert.pem
The last certificate in the file is your current CA.
Copy the Current CA:
Copy the content of the current CA and paste it into a text file (e.g., 2ca.txt).
Add the New CA:
Open your new CA certificate in a text editor, copy its content, and append it to 2ca.txt.
Save and Rename:
Save the file, create a copy, and rename it to 2ca.crt.
Your merged CA file (2ca.crt) is now ready for the next step.
3: Create the Configuration Package.
In the WAPT Console, package templates are available by clicking WAPT Packages → Host agent dynamic configuration.
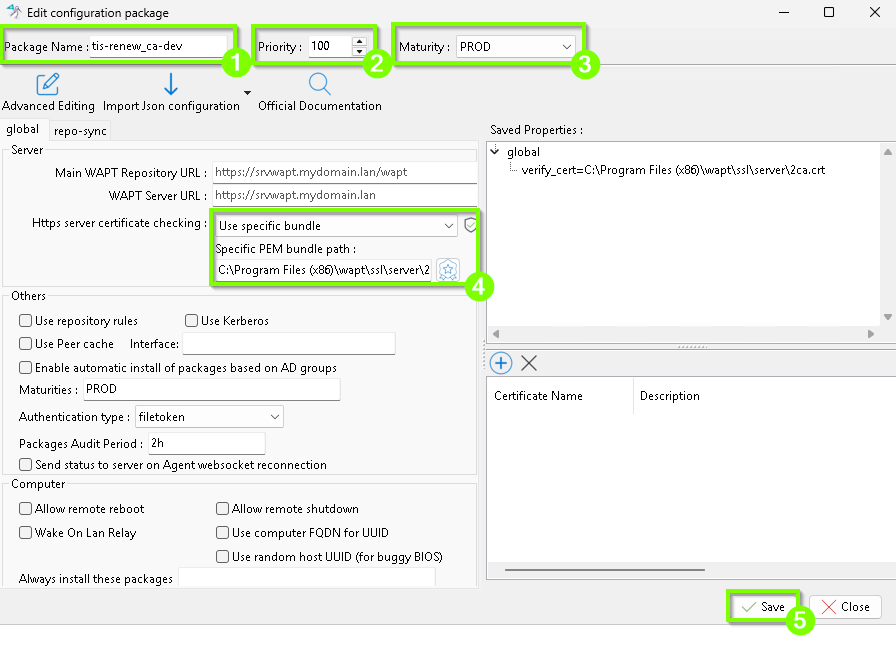
Enter a name, for exemple prefix-renew_ca-dev. (1)
Enter a priority, is important to fix a very high priority. In fact, if a package has a higher priority, it will prevent your package from being installed.. (2)
Select the maturity level of PROD. (3)
Choose the Global configuration panel.
Select Use specific bundle and deposit the new ca file (example; deposit in wapt/ssl/server/2ca.crt). (4)
Click Save to apply the configuration. (5)
Your Configuration Package is now ready.
wapt add new certificate ca
4: Install the Package on the Machine
Deploy the newly created configuration package to the machine.
5: deploy the new cert.pem on the server.
Once all machines in your fleet have the new CA:
Access the WAPT Server and navigate to the SSL directory:
cd /opt/wapt/waptserver/ssl/
Backup and Replace the Certificate Files:
Backup the current cert.pem:
mv cert.pem cert.pem.2025
Edit cert.pem and paste the contents of your new fullchain certificate.
vi cert.pem #copy the contents of your new fullchain
If you have an internal PKI or a self-signed certificate, you may also have a ca_cert.pem file. Backup and replace it:
mv ca_cert.pem ca_cert.pem.2025
Edit ca_cert.pem and paste the contents of your new CA only.
vi ca_cert.pem #copy the contents of your new ca only
Restart the nginx on yout WAPT server :
systemctl restart nginx.service
6: Restart the WAPT Console and Update the Cache
Once the machine switches to the new configuration, it will disappear from your current WAPT console. This happens because your console relies on the old CA certificate file (xxx.crt), located at: C:\Users\Administrateur\AppData\Local\waptconsole\ssl\server.
To resolve this:
Remove the old CA file (xxx.crt) from the sslserver directory.
Place your merged CA file (2ca.crt) in the same directory.
Restart the WAPT console.
The machine should now reappear in the console. Test package updates and message delivery to ensure everything functions correctly.
Your CA transition is now complete. All agents should now communicate securely using the new CA.
Warning
Beware of machines that have not been started for X days via this request ( how the reporting tab works here ).
In the example below the value is 14 days, you can change it if necessary.
SELECT
uuid,
computer_name,
last_seen_on
FROM
    hosts
WHERE
    TO_TIMESTAMP(last_seen_on, 'YYYY-MM-DD') < CURRENT_TIMESTAMP - INTERVAL '14 days'
ORDER BY
    last_seen_on;
2.1.2. SSL/TLS Certificate Authority (CA) Renewal after Expiration
Danger
Important Notice for Future WAPT Server Updates
During the next update of your WAPT server, ensure that the new WAPT agent relies on the updated certificate and not the old one. Failure to validate this may result in connectivity issues between the agents and the server.
If your Certificate Authority (CA) has already expired, there is no native method to regain control over your fleet of machines. However, depending on your environment, you can use the following recovery methods:
Hint
if you go to commercial certificate to another commercial certificate, you just keep the parameter verify_cert = 1. That should be enough, but do a test before go to prod.
2.1.2.1. For Machines in an Active Directory Environment
If a significant portion of your machines are part of an Active Directory (AD), you can use Group Policy Objects (GPO) to:
Open Group Policy manager:
Deploy the new CA certificate directly to the wapt/ssl/server directory.
Path: Computer Configuration → Preferences → Windows Settings → Files.
for example:
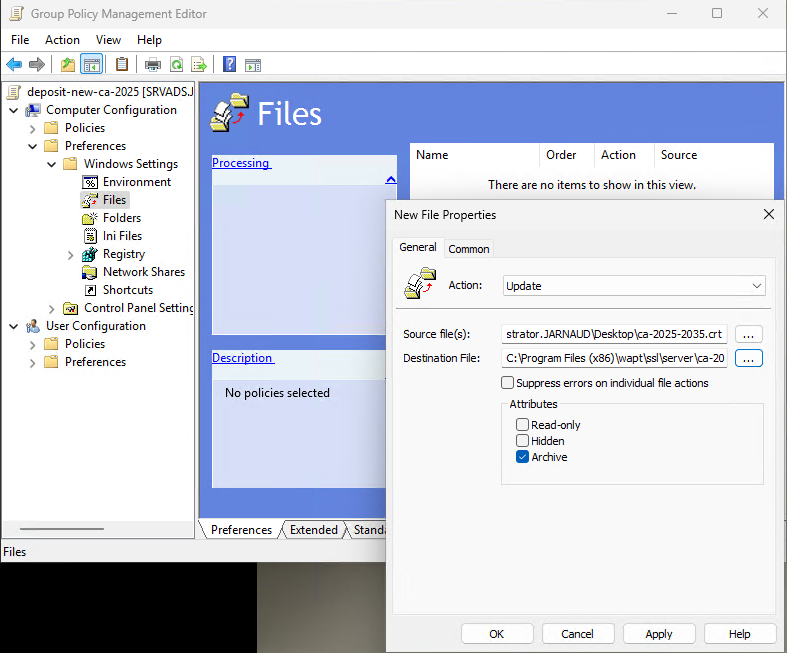
Copy crt by gpo
Update the wapt-get.ini configuration file on all machines.
Path: Computer Configuration → Preferences → Windows Settings → INI Files.
for example:
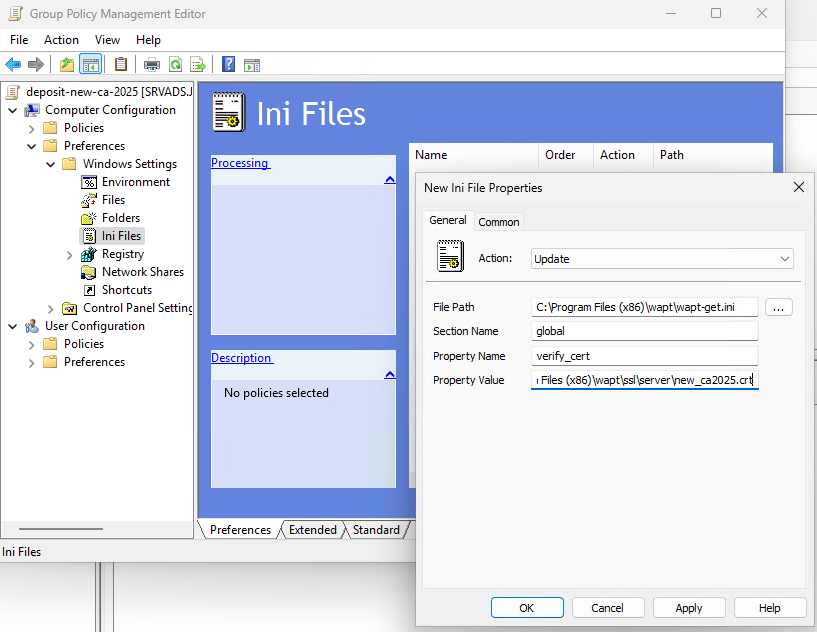
Modify ini by gpo
This approach allows you to automate the recovery process across your AD-joined machines.
2.1.2.2. For Non-AD Machines (Manual Recovery)
For machines not part of Active Directory, recovery may require manual intervention on each machine:
Modify the CA certificate (cert.pem and key.pem) on your waptserver and relaunch the postconf.sh
mv cert.pem cert.pem.2025 #just in case keep the old cert.pem
vi cert.pem #copy your new certificate
systemctl restart nginx.service
Use a USB drive to transfer in the wapt/ssl/server agent directory the new CA certificate.
Manually update the agent’s configuration file (wapt-get.ini).
verify_cert = C:\Program Files (x86)\wapt\ssl\server\your_new_ca.crt
Restart the WAPT service to apply the changes.
net stop waptservice
net start waptservice
wapt-get register
Check that the computer is back online in the waptconsole and fully functionnal (update packages, sent a waptmessage)
This method is time-consuming but necessary for machines outside of AD management.
2.2. What procedure should I follow if my WAPT server is inoperative (fire, flood, physical destruction)?
Note
Assess the level of urgency:
Determine whether the situation requires immediate action. For example:
Case 1: If you need to install a new package or an urgent update, the urgency is critical and rapid action is required.
Case 2: If you don’t regularly use updates via WAPT, new packages, deployments or reporting, you may have a few days, or even a week, before taking action.
Note
If you have an external backup solution, you can follow this documentation to easily recreate the WAPT server.
This suggested solution only applies if you have an Active Directory and many agent machines that are members of your AD.
1- Create a new server:
The quickest solution is to recreate a server. You can follow the links below:
Check the server requirements.
Install the server according to the OS.
Launch the WAPT console and create an agent.
2- Create a GPO that modifies several parameters in the wapt-get.ini file:
Before doing so, consult the existing wapt-get.ini file on your agents.
Make a note of the parameters that need to be changed in order to point your agents to your new server.
Warning
If you were using WAPT configuration packages, you also need to change the [default-global] section.
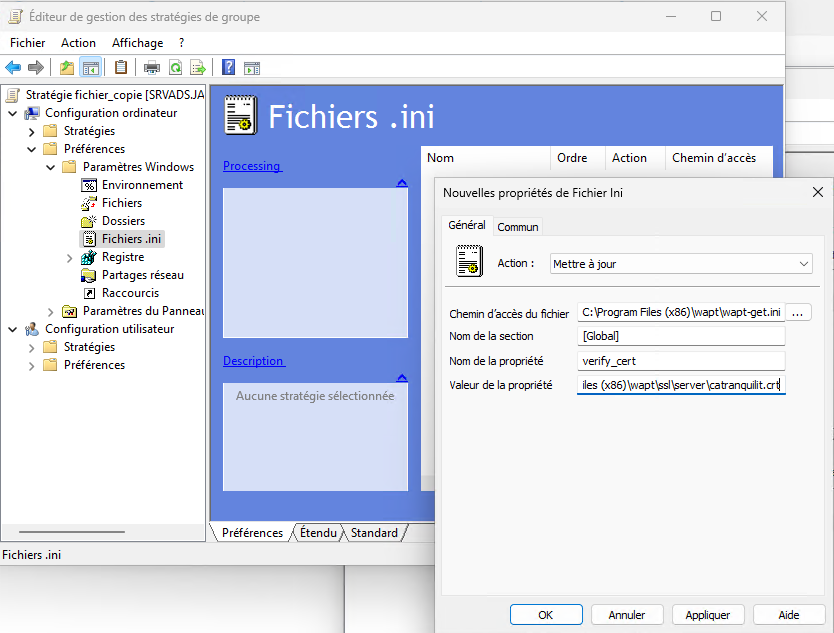
GPO for ini file.
In this image, we modify the verify_cert parameter line to pin the new WAPT server certificate.
Other modifications may of course be necessary.
This will allow the agents to switch to the new server and re-establish control over the machines.
3- Set up regular external backups:
Finally, the best solution is to set up regular backups. This will enable a clone to be restored quickly in the event of failure.
2.3. WAPT Server behind a reverse proxy
Attention
The support of reverse proxy (WAF, etc.) doing TLS interceptions or TLS terminaison is no longer supported.
If you have a reverse proxy in front of the WAPT server, it has to be configured as a simple TLS forwarding proxy based on SNI (cf. ngx_stream_core_module on nginx server, for example).
First you need to check if the stream module package (libnginx-mod-stream on Debian / Ubuntu, nginx-mod-stream on RedHat and derivatives) is installed on the NginX Reverse Proxy server.
Then you can insert the following content into
/etc/nginx/modules-enabled/80-stream.confof the NginX Reverse Proxy server:
stream {
tcp_nodelay on;

map $ssl_preread_server_name $https_upstream {
  wapt.mydomain.com  192.168.2.5:443;   # 192.168.2.5 is the local IP address of the WAPT server
}

server {
  listen 443;

  resolver 127.0.0.1;

  proxy_pass $https_upstream;
  ssl_preread on;
}
}
Similar configuration is possible using HAProxy TLS Passthrough module but we do not provide support. Please refer to the corresponding documentation for details.
2.4. Resetting the WAPT Linux Server password
It sometimes happens to setup a WAPT Server and then forget its password.
To reset the WAPT Console SuperAdmin password you have to relaunch the post-configuration process on the WAPT Server:
Connect to the WAPT Server with SSH.
Connect with user root (or use sudo).
Launch the post-configuration script.
2.5. Problems when enabling enable-check-certificate
2.5.1. Message “Certificate CN ### sent by the WAPT Server does not match URL host ###”
This means that the CN in the certificate sent by the WAPT Server does not match the value of the wapt_server attribute in the wapt-get.ini file of the WAPT Agent.
There are 2 solutions:
Check the value of
wapt_serverin thewapt-get.inifile of the WAPT Agent.
If the value is correct, this surely means that an error has happened during the generation of the self-signed certificate during the WAPT Server post-configuration (typing error, …).
You MUST then regenerate your self-signed certificates.
On the WAPT Server, delete the content of the
/opt/wapt/waptserver/apache/ssl/folder.
Then, relaunch the post-configuration script (the same as the one used during initial installation, with the same arguments and values).
Then, be sure that the value of FQDN for the WAPT Server is correct.
You may now retry enable-check-certificate.
2.6. What can go wrong during the upgrades of WAPTserver ?
The most common issue with the upgrading process is the local antivirus blocking the installation (WAPT is a software installer that keeps a websocket opened to a central management server, so this behavior may be flagged as suspicious by an antivirus, even though this method is the basis of end point management…). If you have an issue when deploying the upgrade, please check your antivirus console and whitelist the waptagent.exe. Another option is to re-sign the waptagent.exe binary if your organization has an internal code signing certificate.
The second most common issue is that for some reason another program is locking a DLL that ships with WAPT. This can happen with poorly designed software installers that pick up the local
%PATH%variable first and then find WAPTs own openssl or python DLL.The third most common issue is a defective Windows install, that does not run scheduled tasks properly, and yes we have seen this!